Showing posts with label Easy. Show all posts

Saturday, December 7, 2013

Chocolate Earl Grey Cake


My friend Ashindi made this treat for me a couple of years ago.  It’s a delicious and unusual chocolate cake which is perfect for the Christmas season.


Earl Grey is a type of black tea flavored with bergamot oil, which is extracted from the rind of the bergamot orange.  It is thought to have been created for Charles Grey, British Prime Minister in the early 1830s.  Earl Grey tea has long been used to flavor baked goods, confections, and sauces.


Ingredients
4 black Earl Grey tea bags
1 cup boiling water
7 ounces bittersweet chocolate
2 cups unbleached all-purpose flour
1 teaspoon baking soda
1 teaspoon baking powder
1/4 teaspoon salt
1/2 cup unsalted butter (1 stick)
2 cups sugar
3 eggs
6 ounces plain yogurt (approximately 1/2 cup)


Directions

1.     Brew tea bags in 1 cup of boiling water.  Steep for 10 minutes.  Remove bags and set tea aside.

2.     Break chocolate into small pieces and melt in a microwave (heat for 1-2 minutes on high) or over lowest heat on stovetop.  Set aside.

3.     In a small bowl, mix flour, baking soda, baking powder, and salt.  Set aside.

4.     Preheat oven to 350F.

5.     Butter and flour Bundt pan.

6.     Using a hand mixer, beat butter and sugar in a large mixing bowl until light and fluffy.  Add eggs and beat until well mixed.

7.     Add yogurt and cooled chocolate.  Mix thoroughly.  Add cooled tea and beat on low to prevent splattering.

8.     Add half the flour mixture and beat into liquid ingredients.  Add remaining flour and mix well.

9.     Using a spatula, transfer batter to Bundt pan and smooth the top.

10.  Bake for 50-60 minutes or until a knife inserted in the center comes out nearly clean.

11.  Remove from oven and cool at room temperature for 10 minutes.

12.  Unmold cake and cool to room temperature.

13.  Serve with whipped cream or ice cream.

Tuesday, July 9, 2013

Summer Eggplant Salad


This is a perfect starter or side dish for a hot summer day.

The eggplant is native to the Indian subcontinent and was brought to Europe by Arabs in the Middle Ages.  The first known written documentation comes from a Chinese agricultural text dating from 544; the first European reference is in an English botany text from 1597.

The eggplant is a member of the nightshade family and was domesticated from the wild nightshade, also known as the thorn apple or bitter apple.  It is closely related to the tomato and potato.  In most languages, the fruit is known by some variation of the words aubergine, brinjal, or melongene, all of which derive from a Dravidian word that was borrowed into Sanskrit and Pali, then into Persian, then into Arabic, and finally into European languages.

The 18th century cultivars popular in Europe were spherical and light in color, hence the name ‘eggplant’ which is still used in American English.  Although most North Americans are now familiar with the dark purple cultivar, eggplants come in shades of white, yellow, green, and reddish-purple.  There is also great variation in size—ranging from that of a grape to a watermelon.

Eggplant has a firm skin and smooth, spongy flesh.  It can be stewed (as in French ratatouille), fried (as in Italian eggplant parmensan), stuffed (as in Turkish Imam bayildi), curried (as in Indian curries), mashed (as in Middle Eastern baba ghanoush or on pizza), pickled (as in Syrian makdous), and braised or steamed in various Chinese dishes.  Eggplant has become popular as a meat-substitute in vegetarian cuisine.

Five nations account for 90% of international eggplant production; China leads the way followed by India, Egypt, Iran, and Turkey.


Serves 4-6

Ingredients
1/2 cup extra virgin olive oil
1 lemon, juiced
3/4 teaspoon salt
1/2 teaspoon black pepper, freshly ground
2 pounds eggplant, cut into 1-inch chunks
3 ounces feta cheese, crumbled
1 clove garlic, minced
1 tablespoon capers, chopped
2 green bell peppers, cut into 1-inch pieces
1 cup cherry tomatoes, halved
1/4 cup fresh mint leaves

Directions
1. Preheat oven to 425 degrees.
2. Whisk together the oil, lemon, salt, and pepper to create the dressing.
3. Toss eggplant with 1/3 cup dressing, and spread onto a baking sheet.  Bake for 30 minutes, tossing occasionally until tender and golden around edges.  Remove from the oven and let the eggplant cool so that it is warm (but not hot enough to melt the feta).
4. Mix feta, garlic, and capers into reserved dressing.
5. In a large bowl, combine baked eggplant, peppers, tomatoes, and mint leaves. Toss with reserved dressing and serve within 2 hours.

Friday, May 24, 2013

Shrimp Tacos


A taco is a traditional Mexican dish consisting of a corn or flour tortilla wrapped around a filling. Tacos are usually filled with a combination of meat, chicken, seafood, cheese and vegetables and served with various salsas and condiments. The word taco means ‘plug’ and is thought to have been coined by Mexican silver miners due to its resemblance to an explosive consisting of gunpowder wrapped in paper.

I grew up in Canada eating store-bought hard shell corn tacos. We used to buy perfectly formed Old El Paso plastic-wrapped shells. We would fill these with ground beef topped with thinly sliced iceberg lettuce, chopped tomatoes, grated cheddar cheese, and a little bit of salsa.

It has been years since I had one of these childhood treats, so Cinco de Mayo was a great opportunity to rediscover and re-imagine the taco.  This unconventional version has the perfect combination of spicy, sweet, and salty flavors.


Serves 4

Ingredients

3 tablespoons mayonnaise (reduced or whole fat)
2 limes
1/2 teaspoon sugar
1 jalapeno pepper, finely diced (optional)
1 bunch of cilantro, leaves only, roughly chopped
3/4 pound cooked and peeled shrimp (sliced in half) or other seafood such as crabmeat, lobster, or salmon
12-ounce package coleslaw mix (including green cabbage, red cabbage, and carrots)
1 mango, peeled, cut into thin strips
1/2 small red onion, thinly sliced (optional)
salt (to taste)
12 small tortillas or hard taco shells
Red Rooster chili sauce for serving (optional)

Directions

1. In a small bowl, make dressing by mixing mayonnaise, juice of 1 lime, 1 tablespoon water, sugar, jalapeno pepper, and 1/3 cilantro leaves.
2. Toss shrimp or seafood with 2 tablespoons of dressing until just coated. Set aside.
3. Combine remaining cilantro, coleslaw, mango, red onion, remaining dressing, and salt in a large bowl.  Mix until thoroughly combined.
4. If making soft tacos, warm tortillas in skillet. To serve, spread tortilla or hard taco with chili sauce and fill with seafood and coleslaw mixture. Serve with lime wedges.

Tuesday, May 21, 2013

Quick Sopaipillas


Sopaipillas are a traditional dessert I discovered while living in the American Southwest.  I first tried them at the El Rialto Restaurant in Las Vegas, New Mexico, a few miles from where I lived.

These treats are sometimes referred to as little pillows, since they are puffed and hollow in the center.  The word means ‘little bread soaked in oil.’  This is a quick version made from tortillas; the original is made from fresh dough.

Fried dough is a treat in many culturesincluding donuts in America, puri in India, mandazi in East Africa, and churros in Mexico.  Fried dough is sometimes dusted, dipped, or filled; other times it is served in its unadorned golden splendor.

For me, the hardest thing about frying is making sure the oil is at the correct temperature.  If you don’t have a thermometer, test the oil by dropping in a small amount of dough.  It should produce vigorous bubbles and reach a golden brown color in 60 seconds.  If it browns too quickly or slowly, adjust the temperature accordingly.

Ingredients
4 8-inch wheat tortillas
vegetable oil (preferably canola or corn), for frying
powdered sugar or cocoa (optional)
honey, for serving (optional)

Directions
1.     Heat 1/2 to 1-inch oil in a deep and small pot on medium-high heat.  Let the oil heat for 5-10 minutes before testing it.  The oil should be 350F.
2.     Cut tortillas into wedges or strips.
3.     Fry tortillas pieces in batches for 1 to 2 minutes on each side, flipping once.  Drain on a plate lined with paper towels. 
4.     Dust with powered sugar or cocoa.
5.     Drizzle or dip into honey to serve.

Thursday, March 21, 2013

Irish Soda Bread


Like many holidays with a religious origin, St. Patrick’s Day has become a secular observance in much of the United States.  The day celebrates one of the most recognized patron saints of Ireland who brought Christianity to the island in the 5th century.  He is also credited with banishing snakes from the country, though scientific evidence suggests there were no snakes in post-glacial Ireland.

While it has not taken on the commercialism associated with Christmas, Valentine’s Day, and Halloween, this holiday is often associated with bacchanalian revelry.  On this night, Irish pubs and other watering holes teem with some of the 36 million Americans that claim Irish ancestry (and many others who make no such claims!) decked out in green shamrocks, clothing, accessories, and face paint.  While I tend to avoid the crowds on this night, I decided to observe the occasion by baking soda bread—a treat commonly made by North Americans on St. Patrick’s Day.

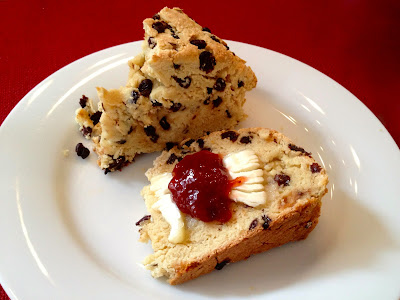
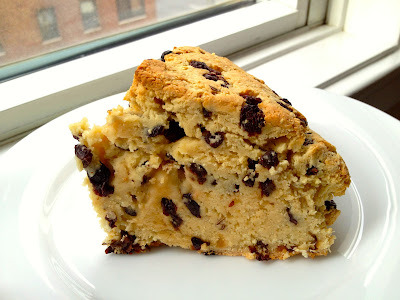
Traditionalists complain that modern versions hardly resemble the original recipe, which was limited to flour, baking soda, salt, and buttermilk.  My formula includes a few enhancements—caraway seeds, currants, egg, and a touch of sugar—but is restrained in comparison to some cake-like creations.  An online search revealed soda bread recipes with chocolate, butter, orange zest, pastry flour, and loads of sugar; these decadent items sound more like components of French pastries than the baked goods of the formerly poverty-stricken Irish.  One disparaging online testimonial scoffed at the notion of orange zest in soda bread, reminding the audience that oranges were a rare treat only given to children at Christmas.

Thankfully, we live in less austere times and so we can enjoy soda bread (and oranges) more than once a year.


Serves 8-12

Ingredients
4 cups unbleached all-purpose
4 tablespoons sugar
1 teaspoon baking soda
1 teaspoon salt
1 tablespoon caraway seeds
1 cup dried currants or raisins
2 cups buttermilk
1 extra-large egg, lightly beaten

Directions

1. Preheat the oven to 375 degrees F.
2. In a large bowl, combine the flour, sugar, baking soda, salt, caraway seeds, and currants/raisins.
3. In a small bowl, beat the buttermilk and egg together.
4. Using a wooden spoon, add the wet ingredients to the dry ones.  Knead the dough to incorporate all the ingredients and add additional buttermilk (in one tablespoon increments) if needed.  Do not knead the dough too much.  The dough should be rough and craggy; it will not be smooth like dough that contains butter and more eggs.
5. Shape loaf into a ball and flatten slightly.  Place it on a baking sheet lined with parchment paper.
6. Score the loaf with an X that comes almost to the edge of the loaf.  The cut should be about 1/4 inch deep.
7. Bake for 50 to 60 minutes, or until a cake tester comes out clean. When it is done, tapping the loaf will produce a hollow sound.
8. Cool on a baking rack for 5-10 minutes.  Serve warm or toasted with butter, jam, or honey.
9. To freeze, cover with saran wrap and place in an airtight container for up to 2 months.

Thursday, January 31, 2013

Winter Carrot Soup


Although it has been an unseasonably mild winter, I have been craving soup in the evenings.  This carrot soup packs an unusual combination of spicy, tart, and rich flavors.  It is perfect as a starter or, if served with hearty bread, as a main dish.


Serves 4 to 6

Ingredients

4 tablespoons (1/2 stick) unsalted butter
2 small potatoes, quartered
6 large carrots, cut into 1/2 inch segments
1 bay leaf
2 teaspoons hot Madras curry powder
1 teaspoon ginger powder
1 teaspoon oregano
4 cups stock or water
1/2 cup cranberry juice
juice of 1 lime
1/4 cup evaporated milk
1/2 teaspoon salt
1/2 teaspoon fresh ground black pepper
1/2 teaspoon cayenne powder

Directions

1.  In a large pot, melt butter over medium heat.
2.  Sauté potatoes and carrots in butter for approximately 10 minutes.  Add bay leaf, curry powder, ginger, and oregano.  Continue to cook for 5 more minutes.
3.  Add stock or water and increase heat until liquid reaches a slow boil.  Reduce to simmer and cook for 30 minutes.
4.  In small batches, blend cooked vegetables and liquid and return to the pot.  Alternately, use an immersion blender.
5.  Add cranberry juice, lime juice, and evaporated milk.  Mix well.
6.  Add salt, pepper, and cayenne to taste.

Monday, December 24, 2012

Chocolate Coconut Haystacks


Makes 3 dozen

These treats are perfect for those with limited time and talent for complicated holiday baking.  They can even be made on Christmas Eve with minimal effort!  Haystacks are also ideal for cooking with children.  Since they can be stored in the refrigerator for up to two weeks, they can be made before the holiday madness begins.

My mother-in-law fell in love with haystacks on her travels, and she asked me to make them for Hanukkah.  After some web sleuthing, I developed the following recipe.  Other versions contain dry chow mein noodles or pretzel sticks instead of coconut.  They can also be enhanced with roasted nuts of any type (peanuts, cashews, pistachios, pecans), marshmallows, butterscotch chips, and sea salt.

Ingredients
6 cups sweetened coconut
1 pound semisweet chocolate chips or vegan carob chips
1/4 teaspoon almond extract (optional)
1/2 cup almonds or other nuts (optional)


Directions
1.     Toast coconut on a large rimmed baking sheet at 350F.  Check it regularly and remove when it is fragrant and has turned slightly brown.  Do not leave too long or it will burn.  Remove and set aside.
2.     On the same baking sheet, toast almonds for 10-15 minutes until brown and fragrant.  Remove and set aside.
3.     In a large glass bowl, melt chocolate chips in the microwave.  Heat for 60 seconds and stir, continue heating for 15 seconds and stirring until the chips have melted.  Mix in almond extract.
4.     Add toasted coconut to the chocolate and mix well using a spoon or your hands.
5.     Line the baking sheet with parchment and make haystacks with 2 teaspoons of batter each.  Top with an almond.
6.     Refrigerate for 20 minutes until firm.   Keep in an airtight container for up to 2 weeks.