Showing posts with label Christmas Treats. Show all posts

Saturday, December 7, 2013

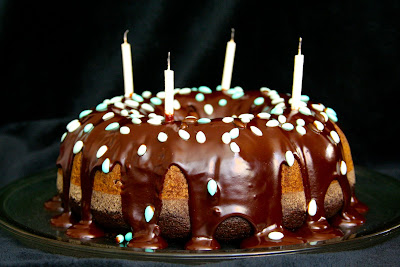
Chocolate Earl Grey Cake


My friend Ashindi made this treat for me a couple of years ago.  It’s a delicious and unusual chocolate cake which is perfect for the Christmas season.


Earl Grey is a type of black tea flavored with bergamot oil, which is extracted from the rind of the bergamot orange.  It is thought to have been created for Charles Grey, British Prime Minister in the early 1830s.  Earl Grey tea has long been used to flavor baked goods, confections, and sauces.


Ingredients
4 black Earl Grey tea bags
1 cup boiling water
7 ounces bittersweet chocolate
2 cups unbleached all-purpose flour
1 teaspoon baking soda
1 teaspoon baking powder
1/4 teaspoon salt
1/2 cup unsalted butter (1 stick)
2 cups sugar
3 eggs
6 ounces plain yogurt (approximately 1/2 cup)


Directions

1.     Brew tea bags in 1 cup of boiling water.  Steep for 10 minutes.  Remove bags and set tea aside.

2.     Break chocolate into small pieces and melt in a microwave (heat for 1-2 minutes on high) or over lowest heat on stovetop.  Set aside.

3.     In a small bowl, mix flour, baking soda, baking powder, and salt.  Set aside.

4.     Preheat oven to 350F.

5.     Butter and flour Bundt pan.

6.     Using a hand mixer, beat butter and sugar in a large mixing bowl until light and fluffy.  Add eggs and beat until well mixed.

7.     Add yogurt and cooled chocolate.  Mix thoroughly.  Add cooled tea and beat on low to prevent splattering.

8.     Add half the flour mixture and beat into liquid ingredients.  Add remaining flour and mix well.

9.     Using a spatula, transfer batter to Bundt pan and smooth the top.

10.  Bake for 50-60 minutes or until a knife inserted in the center comes out nearly clean.

11.  Remove from oven and cool at room temperature for 10 minutes.

12.  Unmold cake and cool to room temperature.

13.  Serve with whipped cream or ice cream.

Monday, December 24, 2012

Chocolate Coconut Haystacks


Makes 3 dozen

These treats are perfect for those with limited time and talent for complicated holiday baking.  They can even be made on Christmas Eve with minimal effort!  Haystacks are also ideal for cooking with children.  Since they can be stored in the refrigerator for up to two weeks, they can be made before the holiday madness begins.

My mother-in-law fell in love with haystacks on her travels, and she asked me to make them for Hanukkah.  After some web sleuthing, I developed the following recipe.  Other versions contain dry chow mein noodles or pretzel sticks instead of coconut.  They can also be enhanced with roasted nuts of any type (peanuts, cashews, pistachios, pecans), marshmallows, butterscotch chips, and sea salt.

Ingredients
6 cups sweetened coconut
1 pound semisweet chocolate chips or vegan carob chips
1/4 teaspoon almond extract (optional)
1/2 cup almonds or other nuts (optional)


Directions
1.     Toast coconut on a large rimmed baking sheet at 350F.  Check it regularly and remove when it is fragrant and has turned slightly brown.  Do not leave too long or it will burn.  Remove and set aside.
2.     On the same baking sheet, toast almonds for 10-15 minutes until brown and fragrant.  Remove and set aside.
3.     In a large glass bowl, melt chocolate chips in the microwave.  Heat for 60 seconds and stir, continue heating for 15 seconds and stirring until the chips have melted.  Mix in almond extract.
4.     Add toasted coconut to the chocolate and mix well using a spoon or your hands.
5.     Line the baking sheet with parchment and make haystacks with 2 teaspoons of batter each.  Top with an almond.
6.     Refrigerate for 20 minutes until firm.   Keep in an airtight container for up to 2 weeks.

Friday, December 7, 2012

Chocolate Gingerbread Cake


Gingerbread describes a wide variety of baked confections made from dough containing viscous sweeteners (such as molasses, honey, or treacle) and spices (usually a combination of ginger, cinnamon, cloves, nutmeg, allspice, black pepper, mustard, cardamom, anise, and others).  It can take a variety of forms from spongy cakes to crispy cookies.

Gingerbread can be traced back to ancient Greece and Egypt where it was used for ceremonial purposes.  Stories differ about its introduction to Europe – some suggest it arrived through Armenian monks while others cite returning crusaders.  In any case, gingerbread quickly spread throughout the continent and is now common in many Northern and Eastern European cuisines.

A precursor to modern gingerbread was a paste made from breadcrumbs that was pressed into wooden molds depicting people and scenes from modern life.  Later versions included wheat flour, eggs, and sweeteners, which resulted in a lighter and more delicate product.  Gingerbread is often associated with winter and especially with Christmastime when it takes the form of gingerbread men (first served by Queen Elizabeth I) and gingerbread houses (developed in Germany based on the Brothers Grimm fairly tale collection that included Hansel and Gretel).

Some gingerbread confections are covered in chocolate, others have fillings such as marzipan, and still others are iced or served with lemon glaze.  This gingerbread cake is drizzled with a chocolate glaze.


Serves 10-12

Ingredients

Cake
2 1/2 cups all-purpose flour
1 1/2 teaspoons baking powder
1/2 teaspoon salt
1/4 cup unsweetened cocoa
2 teaspoons ground ginger
1 teaspoon cinnamon
1/2 teaspoon nutmeg
1 cup unsalted butter
1 cup brown sugar, packed
3/4 cup molasses
2 tablespoons fresh ginger, grated
2 eggs, beaten
3/4 teaspoon baking soda
1 cup boiling water

Glaze
1/3 cup whipping cream
1/4 cup unsalted butter
8 ounces semi-sweet chocolate (chopped or chips)
1 teaspoon vanilla extract
1/4 cup chopped crystallized ginger or small candies, for decoration (optional)
                                                                                  
Directions

1.     Grease and flour a Bundt cake pan.  Preheat the oven to 350F.
2.     In a large bowl sift flour, baking powder, salt, cocoa, ground ginger, cinnamon and nutmeg.  Set aside.
3.     In another large bowl cream butter.  Then beat in sugar, molasses, fresh ginger, and eggs.
4.     Add boiling water to a small bowl with baking soda.
5.     To make the batter, add half of the flour mixture to the bowl with butter and eggs and beat well.  Then add all of the water and baking soda.  Finally, add the remaining flour mixture and beat until just blended.
6.     Pour into cake pan and bake for 50 minutes or until a toothpick inserted into the center comes out clean.  Leave cake in pan for 15 minutes, then invert and cool to room temperature.  Set aside.
7.     To make the glaze, in a small pot simmer whipping cream and butter on low heat.  Remove from heat and add chocolate and vanilla.  Mix until smooth.
8.     When the chocolate glaze has cooled slightly, pour it over the cake.  Decorate with crystallized ginger or small candies.


Saturday, December 31, 2011

Pistachio Cranberry Biscotti


Biscotti are twice-baked cookies that originated in the Italian town of Prato.  They are sometimes referred to as biscotti di Prato or Prato biscuits.  The name derives from the Medieval Latin word biscoctus, meaning twice-baked.  Through French, the word found its way to English as biscuit which now refers to a variety of baked goods including sweet cookies, savory crackers, and small soft breads.

Historically, double baking made the cookies very dry and therefore less perishable than other foods.  They were especially valuable for long journeys and during times of war.  In that way, they are similar to the famously dry Anzac biscuits sent by Antipodean families to young men fighting in Europe during World War I.

Biscotti are a type of cantuccini, a generic term for a variety of twice-baked cookies.  Traditionally, biscotti were made only with almonds, pine nuts, eggs, sugar, and flour.  In contrast, cantuccini may include leavening agents, fats, spices, and other types of nuts.  Outside Italy, the terms cantuccini and biscotti are often conflated.  Within Italy, the term cantuccini is most often used in Tuscany to refer to almond biscotti which are generally served with vin santo.  Similar cookies are also common in certain parts of Spain.

This is the third biscotti recipe posted on Treat a Week and it contains pistachios (green) and cranberries (red) in honor of Christmas.  Guest blogger Sarah posted a lime pistachio biscotti recipe in 2008.  That same year I posted what I referred to as a peanut biscotti, which I now realize was a misnomer since it was not double baked.

Ingredients
1 3/4 cup all-purpose flour
1/4 teaspoon salt
1 teaspoon baking powder
1/4 cup light olive oil (do not use regular olive oil as it will impart a strong olive taste)
3/4 cup granulated sugar
2 teaspoons vanilla extract
1 teaspoon almond extract
2 eggs
1 1/2 cups pistachios (shelled)
1/2 cup dried cranberries

Directions
1.       Preheat oven to 300F.
2.       In a small bowl, mix flour, salt, and baking powder.  Set aside.
3.       In a large bowl, using a large wooden spoon, mix olive oil, sugar, vanilla extract, and almond extract.
4.       Beat in eggs, one at a time.
5.       Slowly add flour mixture until well combined.
6.       Add cranberries and pistachios and mix until well incorporated.
7.       Divide the sticky dough in half.  On a parchment paper lined cookie sheet, form two logs (2-4 inches wide).  To better handle the dough, wet hands with cool water.  You can also wear latex gloves.
8.       Bake for 30-40 minutes or until the dough is light brown.  Remove from the oven for 10 minutes.  Reduce heat to 275F.
9.       When slightly cool, cut logs into 1/2-inch or 3/4-inch thick slices.  Place cookies on their sides and bake for a further 8-10 minutes or until dry.  Cool.
10.   Store in an air-tight container for up to 2 weeks.

Saturday, December 3, 2011

Pumpkin Swirl Cheesecake


This dessert is the marriage of two of my favorite Thanksgiving treats – pumpkin pie and cheesecake. It combines evocative pumpkin pie filling and fragrant fall spices with rich and satisfying cheesecake. It’s the perfect antidote for people who have overdosed on traditional desserts.

This is the third pumpkin pie featured on this blog – click here for coconut and cayenne variations. It is also the sixth cheesecake I’ve presented – check out these peach, blueberry, lemon, berry, and almond mascarpone versions.

Serves 6-8

Ingredients

Crust
1 1/2 cups graham cracker crumbs
1/3 cup unsalted butter, melted
1/4 cup granulated sugar

Filling
12 ounces cream cheese, softened
3/4 cup granulated sugar
1 teaspoon vanilla extract
3 eggs
1 cup canned pumpkin filling
1 teaspoon ground cinnamon
1/4 teaspoon ground nutmeg
1/8 teaspoon ground cloves


 Directions
1. Preheat oven to 325 F. 
2. To make crust, in a large bowl mix graham cracker crumbs, melted butter, and sugar.
3. Using your fingers or the back of a spoon, pack the crumb mixture so that it evenly covers the bottom and sides of a 9-inch metal pie tin.
4. In another large bowl, use an electric mixer to beat cream cheese, sugar, and vanilla.
5. Add eggs, one at a time, and beat until well mixed.
6. Set aside 1/3 of the mixture in a small bowl.
7. Add pumpkin, cinnamon, nutmeg, and cloves and mix with a wooden spoon.
8. Spoon pumpkin batter into base. Dot with dollops of reserved plain batter.
9. Using a butter knife, gently mix the plain batter into the pumpkin batter to create a swirl effect. Be careful not to disturb the crumb base.
10. Bake for 35-45 minutes, or until the batter has set.
11. Cool at room temperature and refrigerate at least four hours before serving.

Wednesday, August 31, 2011

Brigadeiros (Brazilian Truffles)


Today I’m featuring my first dish from Brazil, in honor of that nation’s Independence Day. One hundred and eighty-nine years Pedro, the eldest son of then Portuguese King João VI, declared freedom from Portugal. This happened on September 7, 1822 after 322 years of Portuguese rule. Pedro went on to declare himself Emperor of Brazil and was later briefly King of Portugal before abdicating in favor of his seven year old daughter.


Interestingly, these chocolate truffles also have a link to politics. They are named after Eduardo Gomes, a brigadier in the Brazilian air force who twice ran unsuccessful for the presidency of Brazil. Despite his political failure, Gomes was popular enough that this truffle was named after him.

Brigadeiros are popular at children’s birthday parties and other celebratory events.


Makes 18 truffles

Ingredients
1 14-ounce can sweetened condensed milk
1 tablespoon corn syrup
1 tablespoon unsalted butter
3 tablespoons cocoa, sifted or powdered hot chocolate
finely shredded coconut, finely chopped slivered almonds, colored sanding sugar, sprinkles or other garnish (optional)

Directions
1. In a heavy bottomed pan, heat the first three ingredients over medium heat. Using a heat proof spatula, stir the mixture continuously to prevent it from burning at the bottom of the pan. Some burning may still occur; if it does, do not scrape the burned layer into your mixture.
2. Bring the mixture to a boil and immediately reduce the heat to low. Add cocoa and continue mixing well. Sifted cocoa is more likely to blend in without creating lumps. If you’re feeling unmotivated to sift, un-sifted cocoa or powdered hot chocolate mixture may be used.
3. Stir the mixture for 8-10 minutes until it thickens and pulls away from pan. It should be a dense fudgy batter.
4. Pour into a bowl and allow to cool to room temperature. Then place in the fridge for 4-12 hours.
5. Grease your hands with butter or cooking spray and roll the batter into truffles.
6. If the batter is soft, place these in the fridge to harden.
7. If desired, roll the truffles in a coating of your choice.  This will help to keep softer pieces in better shape.
8. Depending on consistency, place in the fridge or freezer to harden before serving.

Wednesday, May 11, 2011

Mexican Hot Chocolate


We had friends over a couple of weeks ago to celebrate the Mexican holiday of Cinco de Mayo which has become an increasingly popular occasion in the United States. As I’ve described previously on this blog, this is a holiday I regularly celebrate.

At our dinner party, we served quesadillas, guacamole, green salad, Mexican chicken salad, and Spanish rice. For dessert we fried churros, Mexican doughnuts that are traditionally served with a spicy hot chocolate. I decided to make this sweet beverage for the first time.

Hot chocolate originated over 2,000 years ago with the Mayan culture which made a cold chocolate drink from cocoa seed paste, water, cornmeal, chilli, and other ingredients. When the Aztecs gained control over Mesoamerica, they created a bitter and frothy version that also included water, vanilla, and achiote seeds. Xocolatl, the Aztec word for this drink, is the likely origin of our word ‘chocolate’. In Aztec culture, chocolate had medicinal properties, sacred uses, and divine associations.

During the Spanish colonization of Mexico in the 16th century, xocolatl became a favorite of the conquistadors. Later it was introduced into the court of Charles V and became a popular drink among Spanish nobility and the European elite. By this time it was sometimes served hot; the Europeans removed the chilli and added cane sugar, cinnamon, and other spices.

At this time, drinking chocolate was the only form in which chocolate was consumed. In the 19th century, the Dutch created a press to separate cocoa butter from cocoa seeds. This allowed for the creation of solid chocolate which led to the manufacture of bar chocolate. The world has never been the same since!

This hot chocolate recipe uses a variety of spices to provide a rich and complex palette of flavors. Cornstarch thickens the mixture and approximates the consistency of the hot chocolate served in Spain and Mexico with churros.


Serves 4 to 6

Ingredients
5 or 6 cups milk
2/3 cup brown sugar (packed)
6-8 tablespoons cornstarch dissolved in a little water (optional)
3/4 teaspoon cardamom
1/2 teaspoon cloves
3/4 teaspoon cinnamon
1/2 teaspoon nutmeg
1/8 to 1/4 teaspoon crushed cayenne or other chilli powder
1/2 cup unsweetened cocoa powder
1 teaspoon vanilla extract
cinnamon sticks (optional, for garnish)

Directions
1. In a large saucepan or pot, heat first eight ingredients over medium heat. Stir until sugar dissolves. Do not boil and be careful that milk does not burn on the bottom of the pot.
2. Once the sugar has melted, remove from heat and steep spices for 30 minutes.
3. Return mixture to heat and simmer. Add cocoa and vanilla and stir vigorously until cocoa has dissolved.
4. Decant into mugs. Garnish with cinnamon sticks.

Thursday, February 24, 2011

Sour Cherry Shortbread Hearts


I had planned on making sugar cookies for Valentine’s Day. However, the thought of dirtying my countertops, rolling out dough, baking multiple batches, and decorating the cookies with icing, tipped me towards a simpler solution. I just wanted heart-shaped cookies without the fuss, so I adapted a Martha Stewart shortbread recipe I had encountered several years ago.

I've loved shortbread for as long as I can remember. As a child, I coveted Walkers shortbread fingers in the red tartan box. Later, I baked shortbread in the form of petticoat tails and rounds. I also loved my mother’s nankhatai, a ‘Gujarati shortbread’ that contains cardamom and semolina. Here is a pistachio version and a chocolate swirl version. And here is a favorite shortbread recipe I made for Hanukkah.


Shortbread is a Scottish treat traditionally made with one part sugar, two parts butter, and three parts flour. The modifier ‘short’ is an archaic synonym for crumbly; which is due to the high butter content. This is also the origin of the word shortening. Shortbread is baked at a low temperature to avoid browning.

The use of powdered sugar instead of granulated white sugar contributes to the incredibly delicate, melt-in-your-mouth quality of these cookies. This recipe makes just enough hearts for one or two people to indulge and it requires very little cleanup.


Makes 14 cookies

Ingredients
1 cup (2 sticks) unsalted butter, at room temperature
3/4 cup powdered sugar
1 teaspoon vanilla extract
4 drops red food coloring (optional)
1/2 teaspoon salt
1 3/4 cups unbleached all-purpose flour
1/2 cup dried sour cherries or other dried fruit, finely chopped

Directions
1. Preheat oven to 325F.
2. In a large bowl, mix butter and powdered sugar with a wooden spoon. Add vanilla and food coloring and mix well.
3. Add salt and flour and mix until combined. Fold in cherries and mix well.
4. Transfer dough into a 9-inch square, ungreased baking pan. Pat dough with fingers until it is evenly distributed in the pan. Bake for 20 minutes or until shortbread turns brown at the edges.
5. Allow to cool for 20 minutes. Then cut out cookies using a 2-inch heart cookie cutter. The shortbread is very delicate. Use a sharp knife to gently trim stray cherries from cookie. Use a smaller cookie cutter for trimmings.
6. Store cookies and trimmings in an airtight container in the refrigerator for up to a week.

Sunday, December 19, 2010

Peppermint Brownies


One of the best things about Christmas is that it’s associated with some of my favorite flavors and tastes – gingerbread, orange, chestnut, and peppermint. Last weekend I was craving Killer Brownies but wanted to make them seasonal, so I created a holiday version infused with peppermint. This is a combination I’ve tried once before – check out my Pepppermint Perfection Nanaimo Bars.

Peppermint is prized for its leaves and stems which are used to flavor and scent tea, candies, chocolates, chewing gum, cosmetics, and toiletries. Peppermint has a long tradition of medicinal use. It has been shown to repel insects, enhance memory, treat headaches, relieve skin irritation, act as a decongestant, relax muscles, kill bacteria and viruses, and mitigate digestive disorders.

The plant is indigenous to Europe and Asia and is a sterile hybrid of watermint and spearmint. It has been widely cultivated in the New World and is now considered invasive in Australia, New Zealand, Galapagos Islands and the United States.


Makes 48 squares

Ingredients
6 ounces peppermint candy canes
1 lb unsalted butter (4 sticks)
33 ounces semi-sweet chocolate chips
7 large eggs
2 cups granulated sugar
1 tablespoon vanilla extract
1 tablespoon peppermint extract
1 1/3 cup unbleached flour
1 tablespoon baking powder
1 teaspoon salt

Directions
1. Unwrap and break candy canes into 1-inch pieces. Crush with a mortar and pestle. Alternately, lay pieces flat in a large Ziplock bag and use rolling pin or wine bottle to crush. The goal is to break candy canes into smaller pieces (1/8-inch in length) and not to crush into a powder. Set aside.
2. Butter and flour a 3/4 to 1-inch deep 12 x 18 inch baking sheet. Preheat oven to 350F.
3. In a medium pan over lowest heat, melt butter and 12 ounces chocolate chips. Mix thoroughly and set aside to cool slightly.
4. In a large mixing bowl, beat eggs (with a fork, do not use an electric beater), then add sugar, vanilla, and half the peppermint extract. Add chocolate mixture and mix well using a spatula. Allow to cool to room temperature.
5. In a small bowl mix all but 2 tablespoons of flour, baking powder and salt. Using a spatula, fold flour mixture into the chocolate mixture.
6. Toss 3 ounces crushed candy canes and 12 ounces of chocolate chips in reserved 2 tablespoons of flour. Fold these into the brownie batter with a spatula.
7. Pour batter into the baking sheet and bake for 30 to 40 minutes or until a toothpick inserted in the center comes out clean. Halfway through the baking, remove baking sheet and drop on countertop or floor several times to remove air bubbles. Be careful not to overbake these brownies – they should be moist and chewy (not cakey).
8. When brownies have cooled to room temperature, melt remaining 9 ounces of chocolate chips in microwave. Mix in remaining 1/2 tablespoon peppermint extract. Using a knife, spread thinly on baked brownies. Immediately garnish with remaining 3 ounces of crushed candy canes.
9. Cool to room temperature and refrigerate overnight. Using a pizza cutter or knife, cut into squares.
10. In an airtight container, brownies will last in the refrigerator for two weeks. To freeze, wrap individually in plastic wrap and store in an airtight container for up to six months.