Showing posts with label Cakes. Show all posts

Saturday, December 7, 2013

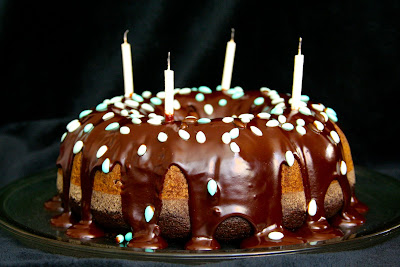
Chocolate Earl Grey Cake


My friend Ashindi made this treat for me a couple of years ago.  It’s a delicious and unusual chocolate cake which is perfect for the Christmas season.


Earl Grey is a type of black tea flavored with bergamot oil, which is extracted from the rind of the bergamot orange.  It is thought to have been created for Charles Grey, British Prime Minister in the early 1830s.  Earl Grey tea has long been used to flavor baked goods, confections, and sauces.


Ingredients
4 black Earl Grey tea bags
1 cup boiling water
7 ounces bittersweet chocolate
2 cups unbleached all-purpose flour
1 teaspoon baking soda
1 teaspoon baking powder
1/4 teaspoon salt
1/2 cup unsalted butter (1 stick)
2 cups sugar
3 eggs
6 ounces plain yogurt (approximately 1/2 cup)


Directions

1.     Brew tea bags in 1 cup of boiling water.  Steep for 10 minutes.  Remove bags and set tea aside.

2.     Break chocolate into small pieces and melt in a microwave (heat for 1-2 minutes on high) or over lowest heat on stovetop.  Set aside.

3.     In a small bowl, mix flour, baking soda, baking powder, and salt.  Set aside.

4.     Preheat oven to 350F.

5.     Butter and flour Bundt pan.

6.     Using a hand mixer, beat butter and sugar in a large mixing bowl until light and fluffy.  Add eggs and beat until well mixed.

7.     Add yogurt and cooled chocolate.  Mix thoroughly.  Add cooled tea and beat on low to prevent splattering.

8.     Add half the flour mixture and beat into liquid ingredients.  Add remaining flour and mix well.

9.     Using a spatula, transfer batter to Bundt pan and smooth the top.

10.  Bake for 50-60 minutes or until a knife inserted in the center comes out nearly clean.

11.  Remove from oven and cool at room temperature for 10 minutes.

12.  Unmold cake and cool to room temperature.

13.  Serve with whipped cream or ice cream.

Wednesday, February 13, 2013

Rose and Cardamom Cake


For many years roses have been associated with love, and that is never more apparent than on Valentine’s Day.

Roses have been cultivated as ornamental plants in the Mediterranean, China, and Persia as far back as 500 BC.  Today there are many thousands of hybrids and cultivars, most of which are prized for their showy petals and fragrance.

In addition to their decorative qualities, these flowers can also be used in food.  Historically, roses bore a red fruit called a rose hip, which has been bred out of many modern cultivars.  Rose hips are commonly used to make herbal tea, soup, jelly, soft drinks, and alcoholic beverages; they are especially prized for their high vitamin C content.  Rose petals are also used in food—when I was traveling in India a decade ago, one of my hosts served me rose petal jam with breakfast.  The petals can also be used in or as a decoration for cakes, cookies, ice creams, and chocolates.

Rose flavors and scents can be extracted for a delicate addition to food.  Rose oil, also known as attar of roses, is steam-distilled from crushed petals in an ancient Persian technique.  It takes approximately 2000 roses to produce one gram of oil.  Rose oil produced through solvent extraction is known as rose absolute.  The process of making rose oil creates a by-product called rose water; when mixed with sugar it becomes rose syrup.  Rose products are widely used in Persian, Indian, Middle Eastern, and Southeast Asian cuisines; they are also used in perfume, cosmetics, medicines, and religious rituals. 

This rose-scented cake is based on a recipe I found on Epicurious.com.  Using whipped cream as a frosting makes for a perfect, airy Valentine’s Day confection.


Serves 6-8

Ingredients
3/4 cup unbleached all-purpose flour
2 tablespoons corn starch
1 cup granulated sugar
1/2 teaspoon cardamom powder
1 1/2 teaspoons baking powder
1/4 teaspoon salt
3 large eggs
6 tablespoons water
1/4 cup canola oil
1 teaspoon lemon zest
2 1/2 cups chilled heavy whipping cream
2/3 cup powdered sugar
1 teaspoon rose water or several drops rose oil
2 tablespoons unsalted pistachios, whole or ground (optional)
Candied or fresh organic rose petals, for decoration (optional)

Directions
1. Preheat oven to 325°F.
2. Butter two round 8-inch cake pans with 1 1/2-inch-high sides.  Line pans with parchment paper and butter parchment.
3. In a large bowl mix flour, cornstarch, half the sugar, cardamom, baking powder, and salt.  Set aside.
4. In a medium bowl, beat egg yolks (place egg whites in another large bowl, set aside), water, canola oil, and lemon zest.
5. Add wet ingredients to dry ingredients and whisk until smooth.
6. Beat egg whites until soft peaks form.  Slowly add the other half of the granulated sugar and beat until whites resemble thick marshmallow fluff.
7. Carefully fold egg whites into egg yolk batter in 3 additions.
8. Divide batter between pans and bake for 25 minutes or until cakes are golden brown, and a tester inserted into the center comes out clean.
9. Cool cakes in pans on rack for 15 minutes.  Remove from pans and cool to room temperature.
10. To prepare whipped cream, beat cream in large bowl until soft peaks form.  Gently add powdered sugar and rose water/oil and beat until peaks form.
11. Place one cake, bottom side up, on platter.  Cover with 1 cup of frosting.  Gently place second cake on top, bottom side up. Spread remaining frosting on top and sides of cake.
12. Chill in the refrigerator for between 1 and 4 hours.
13. Before serving, decorate the cake with rose petals and pistachios.

Friday, December 7, 2012

Chocolate Gingerbread Cake


Gingerbread describes a wide variety of baked confections made from dough containing viscous sweeteners (such as molasses, honey, or treacle) and spices (usually a combination of ginger, cinnamon, cloves, nutmeg, allspice, black pepper, mustard, cardamom, anise, and others).  It can take a variety of forms from spongy cakes to crispy cookies.

Gingerbread can be traced back to ancient Greece and Egypt where it was used for ceremonial purposes.  Stories differ about its introduction to Europe – some suggest it arrived through Armenian monks while others cite returning crusaders.  In any case, gingerbread quickly spread throughout the continent and is now common in many Northern and Eastern European cuisines.

A precursor to modern gingerbread was a paste made from breadcrumbs that was pressed into wooden molds depicting people and scenes from modern life.  Later versions included wheat flour, eggs, and sweeteners, which resulted in a lighter and more delicate product.  Gingerbread is often associated with winter and especially with Christmastime when it takes the form of gingerbread men (first served by Queen Elizabeth I) and gingerbread houses (developed in Germany based on the Brothers Grimm fairly tale collection that included Hansel and Gretel).

Some gingerbread confections are covered in chocolate, others have fillings such as marzipan, and still others are iced or served with lemon glaze.  This gingerbread cake is drizzled with a chocolate glaze.


Serves 10-12

Ingredients

Cake
2 1/2 cups all-purpose flour
1 1/2 teaspoons baking powder
1/2 teaspoon salt
1/4 cup unsweetened cocoa
2 teaspoons ground ginger
1 teaspoon cinnamon
1/2 teaspoon nutmeg
1 cup unsalted butter
1 cup brown sugar, packed
3/4 cup molasses
2 tablespoons fresh ginger, grated
2 eggs, beaten
3/4 teaspoon baking soda
1 cup boiling water

Glaze
1/3 cup whipping cream
1/4 cup unsalted butter
8 ounces semi-sweet chocolate (chopped or chips)
1 teaspoon vanilla extract
1/4 cup chopped crystallized ginger or small candies, for decoration (optional)
                                                                                  
Directions

1.     Grease and flour a Bundt cake pan.  Preheat the oven to 350F.
2.     In a large bowl sift flour, baking powder, salt, cocoa, ground ginger, cinnamon and nutmeg.  Set aside.
3.     In another large bowl cream butter.  Then beat in sugar, molasses, fresh ginger, and eggs.
4.     Add boiling water to a small bowl with baking soda.
5.     To make the batter, add half of the flour mixture to the bowl with butter and eggs and beat well.  Then add all of the water and baking soda.  Finally, add the remaining flour mixture and beat until just blended.
6.     Pour into cake pan and bake for 50 minutes or until a toothpick inserted into the center comes out clean.  Leave cake in pan for 15 minutes, then invert and cool to room temperature.  Set aside.
7.     To make the glaze, in a small pot simmer whipping cream and butter on low heat.  Remove from heat and add chocolate and vanilla.  Mix until smooth.
8.     When the chocolate glaze has cooled slightly, pour it over the cake.  Decorate with crystallized ginger or small candies.


Thursday, June 9, 2011

Black Forest Cake


Black Forest Cake is the English name for Schwarzwälder Kirschtorte (literally “Black Forest cherry torte”). The cake is named after a key ingredient – Kirschwasser (literally “cherry water”), a colorless fruit brandy which is double distilled from whole sour Morello cherries. The brandy is produced in the Black Forest region of southwestern Germany. The liqueur is a critical ingredient in this recipe; in Germany the cake cannot be marketed as Schwarzwälder Kirschtorte without containing Kirschwasser.

The origin of Black Forest Cake is the subject of much discussion. Some claim the confection was created in the 16th century. More recently, two men claimed it as their own. Pastry chef Josef Keller asserted that he invented the cake in 1915 at Café Agner in what is now a suburb of Bonn. A conflicting story is that it was created in 1930 by Erwin Hildenbrand at Café Walz in Tübingen. The cake is first mentioned in writing in 1934; at the time it was particularly associated with Berlin.

Since this cake is fairly elaborate and rich, I decorated it with simple whipped cream instead of making a rich buttercream frosting.

Apparently, National Black Forest Cake Day is March 28, but I decided to post this recipe now rather than depriving you of it for another nine months.


Ingredients
Cake
2 cups unbleached all-purpose flour
1/2 cup cocoa
1 1/2 teaspoons baking soda
1 1/2 teaspoons baking powder
1/2 teaspoon salt
2 ounces unsweetened baking chocolate
3/4 cup unsalted butter (1 1/2 sticks), at room temperature
1 1/3 cups buttermilk
1/2 cup milk
2 cups white granulated sugar
2 eggs
5 teaspoons vanilla extract

Sugar Syrup
2 cups white granulated sugar
1 cup water
1/2 cup Kirsch

Filling
2 15-ounce cans pitted cherries in syrup
3 tablespoons cornstarch
1/4 cup Kirsch

Frosting
1 1/2 cups heavy whipping cream
chocolate shavings, for garnish
fresh or Maraschino cherries, for garnish

Directions
1. Preheat oven to 350F. Grease and flour two 9-inch baking pans.
2. In a large bowl mix flour, cocoa, baking soda, baking powder and salt. Set aside.
3. Melt baking chocolate and 1/2 stick of butter together and set aside. Add milk to buttermilk and set aside.
4. In a large bowl beat remaining stick of butter and sugar together until fluffy.
5. Reduce beater to low and mix in eggs and vanilla.
6. Continue to beat and alternate additions of flour mixture and milk mixture until batter is well mixed.
7. Divide batter between pans and bake for 30-40 minutes or until a toothpick inserted in the center comes out clean. Be careful not to overbake.
8. Remove cakes and cool at room temperature. Place cakes in the refrigerator overnight. In the morning, use a long serrated knife to gently cut each cake horizontally into two layers. Separate layers with wax paper and put back into the fridge.
9. To make the sugar syrup, in a small saucepan bring sugar and water to a boil and stir until sugar dissolves. Cook for a further 2 minutes. Remove from heat. Mix in Kirsch and set aside.
10. To make filling, in another saucepan bring pitted cherries to a boil in their syrup. In a small bowl dissolve cornstarch in Kirsch and add to the warm cherries. Whisk mixture for 2 minutes or until it thickens. Remove from heat.
11. Remove cake layers from the fridge. Brush the freshly cut surface of each layer with 1/4 of the sugar syrup. Allow the liquid to soak in for 30-60 minutes.
12. To assemble, place a cake layer on the cake plate with the cut surface facing up. Cover with 1/3 of the filling (about 1 cup) and top with another cake layer with the cut surface facing up. Repeat with filling and third cake layer also cut surface facing up. Repeat with remaining filling and place fourth and final layer with the cut surface down (so that baked surface is facing up).
13. To make frosting, whip cream on high speed and spread evenly over the top and sides of the cake. Garnish with chocolate shavings, fresh cherries or anything else you fancy.

Saturday, February 6, 2010

Linzer Muffins


On a recent trip to London, my friends Teresa and Kaspar took me to Princi, a Milanese bakery in SoHo. After a healthy salad, I stood indecisively over a vast counter of rustic pastries. I opted for a large slice of linzertorte – an almond-flavored cake spread with raspberry jam.

These muffins take their inspiration from linzertorte, a traditional Austro-Hungarian specialty now popular throughout central Europe. The torte is named after the Austrian city of Linz which was founded by the Romans and was famously home to Kepler, Bruckner, Hitler and Wittgenstein.

The earliest recipe for linzertorte dates back to the mid 17th century. Traditionally it consists of three layers – a bottom layer of pastry made largely with ground nuts (usually almonds, sometimes hazelnuts or pecans, and rarely walnuts), a middle layer of jam (traditionally black currant lekvar, though apricot and raspberry are also used), and a topping of dough strips arranged in a lattice pattern.

Linzertorte is especially popular during Christmas. In addition to cakes and muffin, the concept has been extended to cookies which I sometimes make for Christmas and Valentine’s Day. Watch this space for the recipe…


Makes 12 muffins


Ingredients

1 1/2 cups all-purpose flour
1 cup almond meal
2 teaspoons baking powder
1/2 teaspoon salt
1/2 teaspoon cinnamon
1 large egg
6 tablespoons (3/4 stick) unsalted butter, melted and cooled
3/4 cup sugar
1 cup milk
1/2 teaspoon finely grated fresh lemon zest
1/2 teaspoon almond extract
1/2 cup raspberry jam
1/3 to 1/2 cup slivered almonds, untoasted, for garnish
confectioners sugar for dusting (optional)

Directions

1. Preheat the oven to 375F. Prepare a muffin pan with foil or paper liners. If using paper liners, spray them with cooking spray.

2. In a medium bowl, mix flour, almond meal, baking powder, salt and cinnamon. Set aside.

3. In another, large bowl, beat an egg. Then add butter and sugar. Mix well. Add milk, lemon zest and almond extract.

4. Add the dry ingredients to the wet ingredients and mix until just combined. Do not overmix.

5. Distribute one heaping tablespoon of batter into each liner. Then add a teaspoon (or more) of jam. Fill liners with remaining batter.

6. Sprinkle each muffin with slivered almonds.

7. Bake for 20 minutes or until muffins are golden brown. Remove from the oven and cool muffins in their pan for 10 minutes.

8. These muffins can be served with a dusting of confectioner’s sugar.


Saturday, January 9, 2010

Pineapple Carrot Cake


This is the second carrot cake recipe featured on this site – a follow up to my post on carrot cupcakes which describes the origin of carrots (in Afghanistan) and their use as a sugar substitute in medieval times. Predecessors to modern carrot cake were baked in a piecrust akin to pumpkin pie or steamed like a plum pudding.

Carrot cake experienced a decline in popularity in the eighteenth and nineteenth centuries. In fact, it was fairly obscure until the second half of the twentieth century. In Britain it was revived by the Ministry of Food, which disseminated the recipe during the food rationing of World War Two. The signature cream cheese frosting is a modern American invention that appeared in the 1960s. Some attribute its newfound popularity to its perceived healthfulness since it contains no butter (which is high in saturated fat and cholesterol) and a significant amount of carrots; others dispute this given its sugar and oil content.

To address some of these concerns, this recipe has slightly less sugar and oil than the original, and is balanced by moist and sweet pineapple. The frosting for this recipe also uses an American Neufchatel which contains less fat than regular cream cheese without compromising the taste. Do not skip the coconut extract as it gives the cake an amazing fragrance. Carrot cake is versatile and you can add many of your favorite ingredients to it. I’ve included pineapple, coconut and walnuts; you could also add raisins, pecans, apples, cocoa powder, dried fruit or currants.


Serves 10-12

Ingredients

Cake:
2 cups unbleached all-purpose flour
2 teaspoons baking soda
2 teaspoons cinnamon
1 teaspoon allspice
1 teaspoon salt
1 1/2 cups granulated sugar
4 large eggs
1 1/2 teaspoons vanilla extract
3/4 cup vegetable oil (canola or corn)
1lb carrots, grated (about 3 large carrots)
12 ounces crushed pineapple, drained
1/2 cup shredded coconut (optional)
1/2 to 1 cup walnuts, coarsely chopped and toasted (optional)

Frosting:
12 ounces cream cheese (up to 8 ounces can be American Neufchatel cheese (also called farmer’s cheese)), softened
6 tablespoons unsalted butter, softened
1 cup confectioner’s sugar or to taste
1 teaspoon coconut extract
sprinkles or chopped nuts for garnish (optional)


Directions

1. Preheat oven to 350F. Butter and line two 8-inch round cake pans with parchment. Butter again and flour.

2. In a medium bowl mix flour, baking soda, cinnamon, allspice and salt. Set aside.

3. In a medium bowl, beat sugar and eggs using an electric mixer. Add vanilla and oil and mix well.

4. Add the flour mixture, continuing to beat on low speed.

5. Using a spatula, fold in the carrots, pineapple, coconut and walnuts.

6. Divide batter into cake pans and bake for 30-45 minutes or until a toothpick inserted in the center comes out clean. Cool to room temperature before frosting.

7. To make the frosting, beat together all the ingredients by hand.

8. Unfrosted carrot cake freezes well. Wrap in wax paper, then in saran wrap, and place in an airtight container. Should last 3 to 6 months. The frosting can be kept in an airtight container in the fridge for several weeks or in the freezer for several months.

9. You have several options in terms of presentation. You could individually frost each cake and serve separately. Or you could frost one cake and place the second cake (top-side down) on top and then frost the top and sides. Alternately, you could make half the frosting, frost only one cake, and eat the other cake without frosting (a dusting of confectioner's sugar provides a lovely and light alternate). I recommend eating a frostless cake fresh; frozen cake is best served with cream cheese.

Monday, December 14, 2009

Killer Brownies

Despite their popularity in the United States and my own personal predilection for them, this is only the second brownie recipe to be featured on this blog. The first was for Valentine’s Day almost two years ago. While these are not a traditional Christmas, Hanukkah, Eid or Kwanzaa recipe, Americans adore saccharine chocolate treats at any time of the year.

Brownies are dense chocolate, cake-like squares. They generally contain a higher proportion of eggs and chocolate and a lower proportion of flour than chocolate cake. They are sometimes frosted, and often made with nuts, chocolate chips, cream cheese, dried fruit or coconut. Most commonly brownies are served at room temperature, but many restaurants serve them warm and topped with ice cream, whipping cream, chocolate sauce and/or chopped nuts. Brownies are similar to the less popular blondies (another favorite); the major difference is that the former is made with chocolate batter.

Brownies were first created in Chicago by a chef at the Palmer House Hotel during the 1893 Columbian Exposition. He created these confections for Bertha Palmer, whose husband Potter owned the hotel. The original recipe, which is still served at the hotel, contains nuts and an apricot glaze. The first published brownie recipe produced a cake-like square and appeared in a Boston cookbook in 1906. A new recipe published the following year more closely resembled today’s confection.

This is one of the most delicious brownies I have tasted. It is based on a recipe by Ina Garten but uses less chocolate, nuts, flour and sugar than her version. Still these are exceedingly decadent.


Makes 48 squares

Ingredients
1 lb unsalted butter (4 sticks)
24 ounces semi-sweet chocolate chips
6 large eggs
2 cups granulated sugar
3 tablespoons instant coffee
2 tablespoons vanilla extract
1 cup unbleached flour
1 tablespoon baking powder
1 teaspoon salt
2 cups walnut pieces

Directions
1. Butter and flour a 3/4 to 1-inch deep 12 x 18 inch baking sheet. Preheat oven to 350F.
2. In a medium pan over lowest heat, melt butter and 12 ounces chocolate chips. Set aside to cool slightly.
3. In a large mixing bowl, beat eggs (with a fork, do not use an electric beater), then add sugar, coffee and vanilla. Add chocolate mixture and mix well using a spatula. Allow to cool to room temperature.
4. In a small bowl mix all but 2 tablespoons of flour, baking powder and salt. Using the spatula, fold into the chocolate mixture.
5. Toss walnuts and remaining 12 ounces of chocolate chips in reserved 2 tablespoons of flour. Fold these into the brownie batter.
6. Pour batter into the baking sheet and bake for 30 to 40 minutes or until a toothpick inserted in the center comes out clean. Halfway through the baking, remove baking sheet and drop on countertop or floor several times to remove air bubbles. Be careful not to overbake these brownies – they should be moist and chewy not cakey.
7. Cool to room temperature and refrigerate overnight. Using a pizza cutter or knife, cut into squares.