Showing posts with label British Cookery. Show all posts

Saturday, December 7, 2013

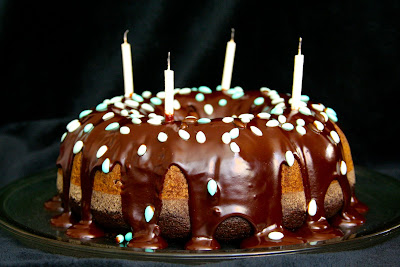
Chocolate Earl Grey Cake


My friend Ashindi made this treat for me a couple of years ago.  It’s a delicious and unusual chocolate cake which is perfect for the Christmas season.


Earl Grey is a type of black tea flavored with bergamot oil, which is extracted from the rind of the bergamot orange.  It is thought to have been created for Charles Grey, British Prime Minister in the early 1830s.  Earl Grey tea has long been used to flavor baked goods, confections, and sauces.


Ingredients
4 black Earl Grey tea bags
1 cup boiling water
7 ounces bittersweet chocolate
2 cups unbleached all-purpose flour
1 teaspoon baking soda
1 teaspoon baking powder
1/4 teaspoon salt
1/2 cup unsalted butter (1 stick)
2 cups sugar
3 eggs
6 ounces plain yogurt (approximately 1/2 cup)


Directions

1.     Brew tea bags in 1 cup of boiling water.  Steep for 10 minutes.  Remove bags and set tea aside.

2.     Break chocolate into small pieces and melt in a microwave (heat for 1-2 minutes on high) or over lowest heat on stovetop.  Set aside.

3.     In a small bowl, mix flour, baking soda, baking powder, and salt.  Set aside.

4.     Preheat oven to 350F.

5.     Butter and flour Bundt pan.

6.     Using a hand mixer, beat butter and sugar in a large mixing bowl until light and fluffy.  Add eggs and beat until well mixed.

7.     Add yogurt and cooled chocolate.  Mix thoroughly.  Add cooled tea and beat on low to prevent splattering.

8.     Add half the flour mixture and beat into liquid ingredients.  Add remaining flour and mix well.

9.     Using a spatula, transfer batter to Bundt pan and smooth the top.

10.  Bake for 50-60 minutes or until a knife inserted in the center comes out nearly clean.

11.  Remove from oven and cool at room temperature for 10 minutes.

12.  Unmold cake and cool to room temperature.

13.  Serve with whipped cream or ice cream.

Thursday, March 21, 2013

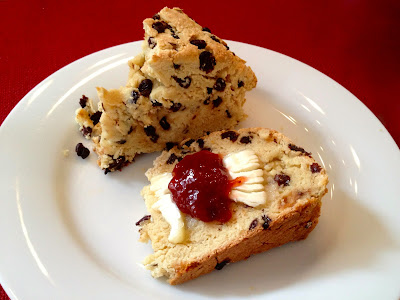
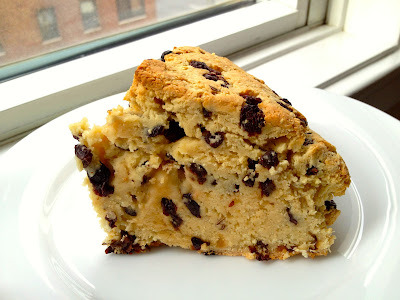
Irish Soda Bread


Like many holidays with a religious origin, St. Patrick’s Day has become a secular observance in much of the United States.  The day celebrates one of the most recognized patron saints of Ireland who brought Christianity to the island in the 5th century.  He is also credited with banishing snakes from the country, though scientific evidence suggests there were no snakes in post-glacial Ireland.

While it has not taken on the commercialism associated with Christmas, Valentine’s Day, and Halloween, this holiday is often associated with bacchanalian revelry.  On this night, Irish pubs and other watering holes teem with some of the 36 million Americans that claim Irish ancestry (and many others who make no such claims!) decked out in green shamrocks, clothing, accessories, and face paint.  While I tend to avoid the crowds on this night, I decided to observe the occasion by baking soda bread—a treat commonly made by North Americans on St. Patrick’s Day.

Traditionalists complain that modern versions hardly resemble the original recipe, which was limited to flour, baking soda, salt, and buttermilk.  My formula includes a few enhancements—caraway seeds, currants, egg, and a touch of sugar—but is restrained in comparison to some cake-like creations.  An online search revealed soda bread recipes with chocolate, butter, orange zest, pastry flour, and loads of sugar; these decadent items sound more like components of French pastries than the baked goods of the formerly poverty-stricken Irish.  One disparaging online testimonial scoffed at the notion of orange zest in soda bread, reminding the audience that oranges were a rare treat only given to children at Christmas.

Thankfully, we live in less austere times and so we can enjoy soda bread (and oranges) more than once a year.


Serves 8-12

Ingredients
4 cups unbleached all-purpose
4 tablespoons sugar
1 teaspoon baking soda
1 teaspoon salt
1 tablespoon caraway seeds
1 cup dried currants or raisins
2 cups buttermilk
1 extra-large egg, lightly beaten

Directions

1. Preheat the oven to 375 degrees F.
2. In a large bowl, combine the flour, sugar, baking soda, salt, caraway seeds, and currants/raisins.
3. In a small bowl, beat the buttermilk and egg together.
4. Using a wooden spoon, add the wet ingredients to the dry ones.  Knead the dough to incorporate all the ingredients and add additional buttermilk (in one tablespoon increments) if needed.  Do not knead the dough too much.  The dough should be rough and craggy; it will not be smooth like dough that contains butter and more eggs.
5. Shape loaf into a ball and flatten slightly.  Place it on a baking sheet lined with parchment paper.
6. Score the loaf with an X that comes almost to the edge of the loaf.  The cut should be about 1/4 inch deep.
7. Bake for 50 to 60 minutes, or until a cake tester comes out clean. When it is done, tapping the loaf will produce a hollow sound.
8. Cool on a baking rack for 5-10 minutes.  Serve warm or toasted with butter, jam, or honey.
9. To freeze, cover with saran wrap and place in an airtight container for up to 2 months.

Friday, December 7, 2012

Chocolate Gingerbread Cake


Gingerbread describes a wide variety of baked confections made from dough containing viscous sweeteners (such as molasses, honey, or treacle) and spices (usually a combination of ginger, cinnamon, cloves, nutmeg, allspice, black pepper, mustard, cardamom, anise, and others).  It can take a variety of forms from spongy cakes to crispy cookies.

Gingerbread can be traced back to ancient Greece and Egypt where it was used for ceremonial purposes.  Stories differ about its introduction to Europe – some suggest it arrived through Armenian monks while others cite returning crusaders.  In any case, gingerbread quickly spread throughout the continent and is now common in many Northern and Eastern European cuisines.

A precursor to modern gingerbread was a paste made from breadcrumbs that was pressed into wooden molds depicting people and scenes from modern life.  Later versions included wheat flour, eggs, and sweeteners, which resulted in a lighter and more delicate product.  Gingerbread is often associated with winter and especially with Christmastime when it takes the form of gingerbread men (first served by Queen Elizabeth I) and gingerbread houses (developed in Germany based on the Brothers Grimm fairly tale collection that included Hansel and Gretel).

Some gingerbread confections are covered in chocolate, others have fillings such as marzipan, and still others are iced or served with lemon glaze.  This gingerbread cake is drizzled with a chocolate glaze.


Serves 10-12

Ingredients

Cake
2 1/2 cups all-purpose flour
1 1/2 teaspoons baking powder
1/2 teaspoon salt
1/4 cup unsweetened cocoa
2 teaspoons ground ginger
1 teaspoon cinnamon
1/2 teaspoon nutmeg
1 cup unsalted butter
1 cup brown sugar, packed
3/4 cup molasses
2 tablespoons fresh ginger, grated
2 eggs, beaten
3/4 teaspoon baking soda
1 cup boiling water

Glaze
1/3 cup whipping cream
1/4 cup unsalted butter
8 ounces semi-sweet chocolate (chopped or chips)
1 teaspoon vanilla extract
1/4 cup chopped crystallized ginger or small candies, for decoration (optional)
                                                                                  
Directions

1.     Grease and flour a Bundt cake pan.  Preheat the oven to 350F.
2.     In a large bowl sift flour, baking powder, salt, cocoa, ground ginger, cinnamon and nutmeg.  Set aside.
3.     In another large bowl cream butter.  Then beat in sugar, molasses, fresh ginger, and eggs.
4.     Add boiling water to a small bowl with baking soda.
5.     To make the batter, add half of the flour mixture to the bowl with butter and eggs and beat well.  Then add all of the water and baking soda.  Finally, add the remaining flour mixture and beat until just blended.
6.     Pour into cake pan and bake for 50 minutes or until a toothpick inserted into the center comes out clean.  Leave cake in pan for 15 minutes, then invert and cool to room temperature.  Set aside.
7.     To make the glaze, in a small pot simmer whipping cream and butter on low heat.  Remove from heat and add chocolate and vanilla.  Mix until smooth.
8.     When the chocolate glaze has cooled slightly, pour it over the cake.  Decorate with crystallized ginger or small candies.


Sunday, June 26, 2011

Chocolate Tiffin (Fridge Cake)


The last time I was in England I had lunch at Pret a Manger and finished it with a ‘Choc Bar’, a British treat often referred to as fridge cake or chocolate concrete. Interestingly, this confection is also known as tiffin, a British Indian word used to describe a snack, light meal, or packed lunch.

Tiffin is usually a combination of dried fruit, cookie pieces, nuts, and chocolate. Although it is virtually unknown in North America, Cadbury’s makes a tiffin chocolate bar.

Tiffin is the perfect treat for summer since it requires no baking. It is also an excellent way to use neglected items in your pantry. This recipe helped me to reduce stores of dried fruit, agave syrup, and pecans that we had purchased in bulk quantities during a short-lived dalliance with Costco.

Ingredients
5 ounces graham crackers (9 double crackers) or digestive biscuits, broken into small pieces (not crumbs)
5 ounces whole dried peaches (approximately 5), chopped into small pieces
1 cup pecans, chopped
1/2 cup unsalted butter (1 stick)
1 1/2 cups bittersweet chocolate chips
1/4 cup agave syrup (can substitute corn syrup, honey or golden syrup)
1 teaspoon vanilla extract
cocoa (for dusting, optional)


Directions
1. Line a 8 x 8-inch baking pan with plastic wrap.
2. In a large bowl, mix graham crackers, peaches and pecans. Set aside.
3. In a large pot over low heat, melt butter, chocolate chips, agave syrup and vanilla extract.
4. Add dry ingredients to chocolate and mix well.
5. Transfer to a baking pan and pat down with the back of a spoon.
6. Cool in the refrigerator for 6 hours or overnight.
7. To serve either unmold and dust with cocoa or cut into individual squares in the pan and serve each slice with a dusting of cocoa.

Saturday, January 9, 2010

Pineapple Carrot Cake


This is the second carrot cake recipe featured on this site – a follow up to my post on carrot cupcakes which describes the origin of carrots (in Afghanistan) and their use as a sugar substitute in medieval times. Predecessors to modern carrot cake were baked in a piecrust akin to pumpkin pie or steamed like a plum pudding.

Carrot cake experienced a decline in popularity in the eighteenth and nineteenth centuries. In fact, it was fairly obscure until the second half of the twentieth century. In Britain it was revived by the Ministry of Food, which disseminated the recipe during the food rationing of World War Two. The signature cream cheese frosting is a modern American invention that appeared in the 1960s. Some attribute its newfound popularity to its perceived healthfulness since it contains no butter (which is high in saturated fat and cholesterol) and a significant amount of carrots; others dispute this given its sugar and oil content.

To address some of these concerns, this recipe has slightly less sugar and oil than the original, and is balanced by moist and sweet pineapple. The frosting for this recipe also uses an American Neufchatel which contains less fat than regular cream cheese without compromising the taste. Do not skip the coconut extract as it gives the cake an amazing fragrance. Carrot cake is versatile and you can add many of your favorite ingredients to it. I’ve included pineapple, coconut and walnuts; you could also add raisins, pecans, apples, cocoa powder, dried fruit or currants.


Serves 10-12

Ingredients

Cake:
2 cups unbleached all-purpose flour
2 teaspoons baking soda
2 teaspoons cinnamon
1 teaspoon allspice
1 teaspoon salt
1 1/2 cups granulated sugar
4 large eggs
1 1/2 teaspoons vanilla extract
3/4 cup vegetable oil (canola or corn)
1lb carrots, grated (about 3 large carrots)
12 ounces crushed pineapple, drained
1/2 cup shredded coconut (optional)
1/2 to 1 cup walnuts, coarsely chopped and toasted (optional)

Frosting:
12 ounces cream cheese (up to 8 ounces can be American Neufchatel cheese (also called farmer’s cheese)), softened
6 tablespoons unsalted butter, softened
1 cup confectioner’s sugar or to taste
1 teaspoon coconut extract
sprinkles or chopped nuts for garnish (optional)


Directions

1. Preheat oven to 350F. Butter and line two 8-inch round cake pans with parchment. Butter again and flour.

2. In a medium bowl mix flour, baking soda, cinnamon, allspice and salt. Set aside.

3. In a medium bowl, beat sugar and eggs using an electric mixer. Add vanilla and oil and mix well.

4. Add the flour mixture, continuing to beat on low speed.

5. Using a spatula, fold in the carrots, pineapple, coconut and walnuts.

6. Divide batter into cake pans and bake for 30-45 minutes or until a toothpick inserted in the center comes out clean. Cool to room temperature before frosting.

7. To make the frosting, beat together all the ingredients by hand.

8. Unfrosted carrot cake freezes well. Wrap in wax paper, then in saran wrap, and place in an airtight container. Should last 3 to 6 months. The frosting can be kept in an airtight container in the fridge for several weeks or in the freezer for several months.

9. You have several options in terms of presentation. You could individually frost each cake and serve separately. Or you could frost one cake and place the second cake (top-side down) on top and then frost the top and sides. Alternately, you could make half the frosting, frost only one cake, and eat the other cake without frosting (a dusting of confectioner's sugar provides a lovely and light alternate). I recommend eating a frostless cake fresh; frozen cake is best served with cream cheese.

Saturday, May 10, 2008

Pimm's Cup


Spring has sprung, and in these times of rising temperature and humidity, nothing quite quenches my thirst like a Pimm’s Cup. While this drink will be well known to British and Commonwealth readers, those from the United States may be scratching their heads.

The posh British answer to “an ice cold beer”, Pimm’s Cup is a cocktail made with Pimm’s No. 1 Cup (commonly referred to as just Pimm’s), a gin-based liqueur infused with a secret recipe of herbs, and served with cucumber and fruit. Incidentally, cucumber replaces the traditional borage leaves which provided a touch of green to the original drink. One might describe it as a British sangria, associated with high society events like Henley, Ascot, Glyndebourne and May Balls.

Pimm’s has humble roots – created by James Pimm, a farmer’s son who went on to own an oyster bar in London’s financial district (known as ‘The City’). The drink became wildly popular in the 1850s and 1860s and inspired a chain of Pimm’s Oyster Houses. Five other Pimm’s drinks were invented, each based on a different alcohol. They have now almost all been phased out except for brandy and vodka versions which are sold in small quantities. The brand is now owned by Diageo, one of the world’s largest alcohol conglomerates.


I last had Pimm's in San Francisco after an excursion to a lovely farmer's market. I've included photos (below) of some of the interesting items we saw there including 'torpedo' onions, huge raspberries and fresh chickens (I was a bit disturbed by the human-like nails on their feet). We also saw kumquats (above) which inspired our non-traditional addition to the Pimm's Cup recipe.


Ingredients
1 part Pimm’s No. 1 Cup
3 parts lemonade or ginger ale, chilled
bunch of mint
fruit including strawberries, Granny smith apples, navel oranges, lemon or any other fruit that appeals (we included kumquats)
ice
cucumber, halved lengthwise and cut into cigar-sized wedges

Directions
1. Mix Pimm’s and lemonade or ginger ale in a large pitcher. Infuse with mint leaves.
2. Slice up fruit – lemons and oranges in cross-section, kumquats in half, strawberries in half or quarter and apples in thin wedges.
3. Serve over ice in highball glasses. Garnish with a wedge of cucumber.

Thursday, March 20, 2008

Sticky Toffee Pudding


Sticky toffee pudding is a quintessential British sweet. It resembles a cake but is a traditional pudding since it is usually boiled or steamed. While the origin of the dessert is contested, the dominant story is that Francis Coulson, a chef at the Sharrow Bay Country House Hotel in England’s Lake District, brought the pudding to mainstream attention.

While I have had this dessert several times, I was surprised to learn that the primary ingredient is dates. Dates are a fruit of the date palm tree and were cultivated in Arabia as far back as 8,000 years ago. They were soon introduced to South Asia, Southeast Asia, North Africa and Spain. In 1765 the Spaniards brought dates to Mexico and what is now California. Iraq and Saudi Arabia are the world's largest producers of dates.

Dates are widely consumed in the Middle East in both savory dishes such as tagines and in sweet dishes such as breads, cakes and puddings. They are referenced several times in the Qur'an and traditionally eaten when breaking the Ramadan fast each night. I was recently at a party where a Saudi Arabian friend brought date sweets from a Bond Street shop including chocolate-covered dates, date cookies and date cakes. Apparently, you can also make a non-alcoholic sparkling date beverage.

The following recipe is adapted from one created by Nigella Lawson.


Serves 8-10

Ingredients
1 1/2 cups dark brown (or muscovado) sugar
1 1/2 teaspoons ginger powder
1 1/2 cups unbleached all-purpose flour
1 1/2 teaspoons baking powder
1/2 teaspoon salt
1/2 cup milk
6 tablespoons butter
8 ounces dates, pitted and chopped
2 eggs
2 teaspoons vanilla extract
2 cups water, boiling

Directions
1. Preheat the oven to 375F and grease a 6-cup, glass, deep ovenproof baking dish.
2. In a medium sized bowl, mix 1/2 cup sugar, ginger powder, flour, baking powder and salt. Set aside.
3. In either a small pot on the stovetop or in a microwave-safe bowl, mix milk, 4 tablespoons of butter and dates. Heat and stir until the dates have dissolved.
4. Allow to cool for 5 minutes and then add eggs and vanilla and mix well. Add the date mixture to the flour mixture and pour batter into the baking dish.
5. In another heatproof bowl mix 1 cup sugar, 2 tablespoons butter and boiling water and gently pour over batter. You should now have a baking dish with a layer of batter at the bottom, underneath a layer of hot brown sugar water.
6. Bake for 45 minutes or until the batter has risen and is firm but springy. Beneath the pudding the sugar water sauce bubbling.
7. Let cool for 10 minutes. Scoop batter and sauce into a bowl and serve with clotted cream, whipped cream or vanilla ice cream.

Wednesday, March 12, 2008

Orange-Scented Scones

Afternoon tea is one of my favorite meals – it arrives just as I’m easing out of the late lunch food coma, and starting to feel peckish in anticipation of dinner. As you can see from my blog, the menu is also to my liking – rich and sweet baked goods including scones, cakes, pastries, and cucumber sandwiches.

Growing up in Canada, my family often had tea with cookies, cake or Indian snacks (such as thepla, nan khatai, khaari biscuit and chevda). It wasn’t until I moved to England that I discovered cream tea (also known as Devonshire or Cornish cream tea) which is tea served with scones topped with clotted cream and jam. My favourite place to have cream tea in Oxford is the Old Parsonage Hotel, a 17th century building where Oscar Wilde once lived.

Although associated with England, scones are small Scottish breads that can be slightly sweet or savory. They sometimes include currants or raisins. Scones are similar to biscuits, traditionally served in the Southern United States with honey, butter or gravy. North American scones, recently popularized by Starbucks, are generally larger, drier and served with nuts, dried fruit or chocolate chips.


Makes one dozen

Ingredients
3 cups unbleached all-purpose flour
2 tablespoons baking powder
1/2 cup white granulated sugar
zest of one orange (optional)
1 stick (1/2 cup) unsalted butter, cold
3/4 cup whole milk
1 egg white (optional)
clotted cream and fruit jam (not optional!)

Directions
1. Preheat oven to 375 F.
2. Mix flour, baking powder and sugar. Using the large holes of a box grater, grate the butter into the flour mixture.
3. Using a pastry cutter, two knives or your fingers, blend in the butter until the mixture resembles coarse meal. Add orange zest and mix well.
4. Add milk and form a soft dough. You can add a little more milk if necessary to bring the dough together.
5. On a well-floured surface, roll out the dough to 1-inch thickness. Using a 1 1/2 inch pastry cutter (I prefer fluted, but plain will do) stamp out as many rounds as possible. Gather scraps and re-roll the dough and stamp out additional rounds.
6. Gently transfer scones to a lined baking sheet (if you don’t use parchment the scones could burn on the bottom). Brush the tops with egg white and sprinkle with granulated sugar.
7. Allow them to stand for 10 minutes, and then bake for 10-15 minutes until light brown on top.
8. Allow them to cool for 10 minutes. Serve with clotted cream and high-quality fruit jam or preserve.

Thursday, February 7, 2008

Passionfruit Tart


On a recent trip to London I met my friends Nadia, Kristina and Catherine for a bottle of wine in the Members Room of the Tate Modern, followed by a fascinating Louise Bourgeois retrospective. Afterwards, we went to a funky restaurant, benugo bar and kitchen, tucked away inside the British Film Institute. Our delicious meal ended with a luscious passionfruit tart. Since we were reconvening for a dinner party the following night, I decided to attempt to reverse engineer the tart.

I must admit I had never seen a passionfruit before (that's it in the photo above). There are two main types, the bright yellow variety has a smooth rind and is the size of a grapefruit and the purple variety (which I used) has a tough wrinkly skin and is the size of an egg. Both are native to Latin America, and are now widely grown in Australia, South and East Africa, the Caribbean, Indonesia, Hawaii and other tropical places.

To my surprise, the name does not come from the passion inspired by this heavenly fruit, but because the structure of the passionflower (below) reminded early Spanish explorers of symbols associated with the Passion of Christ. Specifically, the radial filaments (which vary in number from flower to flower) represent the Crown of Thorns, the ten petals and sepals represent the apostles, the top three stigmata represent the three nails and the lower anthers represent the five wounds.


The tart was tasty but not nearly as flavorful as the original. I suspect the restaurant uses fresh passionfruit pulp or passionatefruit concentrate. As you can see from the photos, I got involved in a great conversation and left the tart in the oven just a little too long. Luckily, it was rescued with only first degree burns, which made it look like a cheese pizza. Ultimately, the tart was well enjoyed since my dinner companions were too polite (and possibly too inebriated) to be critical.


Serves 8

Ingredients
Crust
1 1/2 cups unbleached all-purpose flour
1/2 teaspoon salt
2 tablespoons sugar
10 tablespoons cold, unsalted butter
2 egg yolks
2 tablespoons cold water

Filling
1 1/2 tins sweetened condensed milk (14 ounces each)
6 egg yolks
1 cup passionfruit juice (use fresh passionfruit pulp or passionfruit concentrate if available)


Coulis
8 passionfruits
4 tablespoons confectioner’s sugar

Directions
1. Mix flour, salt and sugar.
2. Cut butter into small pieces and blend with flour until it resembles coarse meal. Add egg yolks and water and roll into a ball. Flatten, wrap in saran wrap and refrigerate for 30 minutes.
3. Preheat oven to 400 F.
4. Roll dough until it is 12 inches in diameter and lay in a 10-inch tart pan.
5. Bake blind for 15 minutes and cool.
6. Mix condensed milk and egg yolks. Add passionfruit juice and mix well.
7. Bake at 350 F for 20 minutes or until set. Cool for 1 hour or overnight.
8. Make passionfruit coulis by mixing passionfruit pulp and seeds and confectioner’s sugar.
9. Serve tart with coulis and whipped cream or crème fraiche.

Friday, December 28, 2007

Chocolate Gingerbread Cookies


“An I had but one penny in the world, thou shouldst have it to buy gingerbread...”
William Shakespeare
Love’s Labours Lost (Act V, Scene 1)

These are the best holiday cookies I have ever eaten. I hate to admit it, but the recipe is adapted from Martha Stewart. Once you taste these, you will understand why they are only the second adapted recipe I have featured on this site. The unbaked dough is divine, and can be eaten straight from the bowl or mixed with vanilla ice cream for a decadent dessert.

Gingerbread was first created in pre-Christian Europe to celebrate the Winter solstice. After the Crusades, Catholic monks began to bake gingerbread for special religious celebrations. In medieval times, gingerbread became associated with secular festivals, which came to be known as ‘gingerbread fairs’. Early bakers produced motifs inspired by daily life. In the seventeeth and eighteenth century, themes expanded to include nobility, floral and geometric designs.

In Medieval England the term gingerbread meant 'preserved ginger', and was adopted from the old French gingebras, which came from the Latin zingebar. Today gingerbread takes many variations – from crispy biscuit to dense cake. This chewy cookie falls somewhere between the two, with a healthy dose of chocolate.


Makes 24 cookies

Ingredients
1 1/2 cups unbleached all-purpose flour
1 1/2 teaspoons ground ginger
1 teaspoon ground cinnamon
1/4 teaspoon ground nutmeg
1 tablespoon cocoa
1/2 cup unsalted butter
1-2 tablespoons fresh ginger, grated (not chopped)
1/2 cup dark brown sugar, packed
1/2 cup molasses
1 teaspoon baking soda
8 ounces semi-sweet chocolate chips or chunks
granulated sugar

Directions
1. In a medium bowl mix flour, ground ginger, cinnamon, nutmeg and cocoa. Set aside.
2. In a large bowl beat butter and ginger. Add brown sugar and beat well; then add molasses and beat well.
3. In a cup dissolve baking soda in 2 teaspoons of boiling water.
4. Beat half of the dry ingredients into the wet ingredients. Add the dissolved baking soda. Then add the remaining dry ingredients and beat well.
5. Fold chocolate chips or chunks into the dough.
6. Pat dough into a circle about 1 inch thick and wrap in plastic. Refrigerate for 1 hour or until the dough has hardened.
7. Roll into 1 inch balls and chill for a further 30 minutes (see photo above). Since the dough does not contain egg, these balls can be kept in the fridge for several days or frozen for later use.
8. Preheat the oven to 325F.
9. To bake cookies, roll balls in granulated sugar and place 1 inch apart on a Silpat-lined baking sheet (you can use parchment paper as well).
10. Bake for 8-10 minutes and allow to cool for 5-10 minutes. If the cookie bottoms are burned and shiny, reduce the oven temperature to 300F and cook for 2 minutes longer. Gently transfer to a wire rack to cool to room temperature.