Monday, December 24, 2012

Chocolate Coconut Haystacks


Makes 3 dozen

These treats are perfect for those with limited time and talent for complicated holiday baking.  They can even be made on Christmas Eve with minimal effort!  Haystacks are also ideal for cooking with children.  Since they can be stored in the refrigerator for up to two weeks, they can be made before the holiday madness begins.

My mother-in-law fell in love with haystacks on her travels, and she asked me to make them for Hanukkah.  After some web sleuthing, I developed the following recipe.  Other versions contain dry chow mein noodles or pretzel sticks instead of coconut.  They can also be enhanced with roasted nuts of any type (peanuts, cashews, pistachios, pecans), marshmallows, butterscotch chips, and sea salt.

Ingredients
6 cups sweetened coconut
1 pound semisweet chocolate chips or vegan carob chips
1/4 teaspoon almond extract (optional)
1/2 cup almonds or other nuts (optional)


Directions
1.     Toast coconut on a large rimmed baking sheet at 350F.  Check it regularly and remove when it is fragrant and has turned slightly brown.  Do not leave too long or it will burn.  Remove and set aside.
2.     On the same baking sheet, toast almonds for 10-15 minutes until brown and fragrant.  Remove and set aside.
3.     In a large glass bowl, melt chocolate chips in the microwave.  Heat for 60 seconds and stir, continue heating for 15 seconds and stirring until the chips have melted.  Mix in almond extract.
4.     Add toasted coconut to the chocolate and mix well using a spoon or your hands.
5.     Line the baking sheet with parchment and make haystacks with 2 teaspoons of batter each.  Top with an almond.
6.     Refrigerate for 20 minutes until firm.   Keep in an airtight container for up to 2 weeks.

Friday, December 7, 2012

Chocolate Gingerbread Cake


Gingerbread describes a wide variety of baked confections made from dough containing viscous sweeteners (such as molasses, honey, or treacle) and spices (usually a combination of ginger, cinnamon, cloves, nutmeg, allspice, black pepper, mustard, cardamom, anise, and others).  It can take a variety of forms from spongy cakes to crispy cookies.

Gingerbread can be traced back to ancient Greece and Egypt where it was used for ceremonial purposes.  Stories differ about its introduction to Europe – some suggest it arrived through Armenian monks while others cite returning crusaders.  In any case, gingerbread quickly spread throughout the continent and is now common in many Northern and Eastern European cuisines.

A precursor to modern gingerbread was a paste made from breadcrumbs that was pressed into wooden molds depicting people and scenes from modern life.  Later versions included wheat flour, eggs, and sweeteners, which resulted in a lighter and more delicate product.  Gingerbread is often associated with winter and especially with Christmastime when it takes the form of gingerbread men (first served by Queen Elizabeth I) and gingerbread houses (developed in Germany based on the Brothers Grimm fairly tale collection that included Hansel and Gretel).

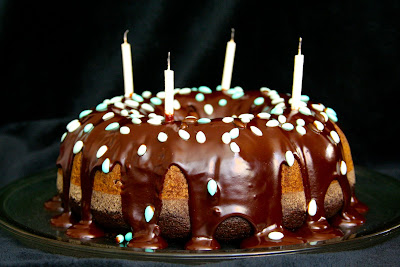
Some gingerbread confections are covered in chocolate, others have fillings such as marzipan, and still others are iced or served with lemon glaze.  This gingerbread cake is drizzled with a chocolate glaze.


Serves 10-12

Ingredients

Cake
2 1/2 cups all-purpose flour
1 1/2 teaspoons baking powder
1/2 teaspoon salt
1/4 cup unsweetened cocoa
2 teaspoons ground ginger
1 teaspoon cinnamon
1/2 teaspoon nutmeg
1 cup unsalted butter
1 cup brown sugar, packed
3/4 cup molasses
2 tablespoons fresh ginger, grated
2 eggs, beaten
3/4 teaspoon baking soda
1 cup boiling water

Glaze
1/3 cup whipping cream
1/4 cup unsalted butter
8 ounces semi-sweet chocolate (chopped or chips)
1 teaspoon vanilla extract
1/4 cup chopped crystallized ginger or small candies, for decoration (optional)
                                                                                  
Directions

1.     Grease and flour a Bundt cake pan.  Preheat the oven to 350F.
2.     In a large bowl sift flour, baking powder, salt, cocoa, ground ginger, cinnamon and nutmeg.  Set aside.
3.     In another large bowl cream butter.  Then beat in sugar, molasses, fresh ginger, and eggs.
4.     Add boiling water to a small bowl with baking soda.
5.     To make the batter, add half of the flour mixture to the bowl with butter and eggs and beat well.  Then add all of the water and baking soda.  Finally, add the remaining flour mixture and beat until just blended.
6.     Pour into cake pan and bake for 50 minutes or until a toothpick inserted into the center comes out clean.  Leave cake in pan for 15 minutes, then invert and cool to room temperature.  Set aside.
7.     To make the glaze, in a small pot simmer whipping cream and butter on low heat.  Remove from heat and add chocolate and vanilla.  Mix until smooth.
8.     When the chocolate glaze has cooled slightly, pour it over the cake.  Decorate with crystallized ginger or small candies.


Wednesday, October 17, 2012

Raspberry and Blueberry Gelatos


Outside North America, Italy is the nation I’ve most often visited.  It provides a wonderful combination of history, architecture, art, culture, fashion, and of course food.  Among Italy’s many earthly delights, gelato ranks near the top of my list.  I am often amazed by the intensity of  flavors which seem to distill and heighten the essence of an ingredient: hazelnut, lemon, chocolate, and pistachio…

In the United States, federal standards require that any item labeled as ice cream contain at least 10% milk fat, at least 20% milk solids, and no more than 1.4% egg solids.  There are no parallel guidelines for gelato; however, it generally contains less milk fat (usually 7-8%).  Unsurprisingly, the Italian government does not regulate use of the term gelato and it is used interchangeably with ice cream.

Gelato was popularized in the early 20th century in the Italian town of Varese where the first gelato cart was developed.  To this day, more than half of the gelato produced in Italy is handmade rather than produced in factories.

Although the crisp autumn air has arrived, I’ve decided to extend summer through a second experiment with my new ice cream maker.  For this endeavor, I decided to experiment with two types of berries.  The raspberry flavor was rather delicate and might have benefited from marbling with extra raspberry puree (detailed on this site).  The blueberry was more intense due to the use of blueberry skins which contain the color and flavor of the fruit.

Ingredients
2 cups raspberries or 2 1/2 cups blueberries (use either fresh or defrosted berries)
1/4 cup water (for blueberry gelato only)
pinch salt (for blueberry gelato only)
1/2 cup granulated sugar
1 1/2 cups half-and-half (2 cups for blueberry gelato)
4 large eggs yolks
1 teaspoon vanilla extract
1-2 drops of red food coloring for raspberry gelato (optional)
fresh berries for garnish (optional)

Directions
1.     For raspberries, purée in a blender and press through a sieve to remove seeds.  For blueberries, cook fruit with 1/4 cup water and a pinch of salt for 10 minutes over medium heat.  Remove from heat and purée in a blender until smooth.  Set aside berry purée.
2.     Heat the sugar and half of the half-and-half in a saucepan.  Simmer over medium heat until the sugar is dissolved.  Set aside on low simmer.
3.     Using a hand mixer, beat the egg yolks until light and thick.  Then add 1/2 cup of warm half-and-half mixture to egg yolks and blend well.
4.     Gently pour the egg mixture into the saucepan with the half-and-half mixture.  Mix well and raise the heat to medium.  Stir constantly with a wooden spoon.
5.     When the mixture is thick and reaches 180F on a thermometer, remove from heat.  Add remaining half-and-half, berry purée, vanilla extract, and food coloring.  Mix well.
6.     Cover and refrigerate overnight.
7.     Prepare gelato in an ice cream maker according to the manufacturer’s instructions.
8.     The gelato will be soft and creamy and ready to serve.  If you prefer a firmer consistency, transfer the mixture to a freezer-safe, air-tight container for several hours.  Best to freeze in serving size portions to avoid multiple thawing and freezing.
9.     Remove gelato 10 minutes before serving.  Serve with fresh berries.  Raspberry gelato also goes well with chopped salted pistachios or chocolate sauce.
10.  Gelato will keep for up to one month in the freezer.

Sunday, August 26, 2012

Lemon Sorbet


One of summer’s greatest gifts is ice cream.  I rarely eat ice cream during the rest of the year, but in the summertime I consume it several times a week.  When I was young, my parents used to buy one gallon tubs or boxes of vanilla, chocolate, strawberry, or Neapolitan ice cream.  Grocery store ice cream choices have expanded significantly since my childhood, and the exotic flavors that were only available at ice cream parlors are now sold at grocery and convenience stores across the country.

I had not made ice cream until a few years ago when my friend Yvonne showed me her recipe for Thai tea ice cream.  Since then I’ve been dreaming of owning an ice cream maker; my wish recently came true through a gift from a friend.

We inaugurated our new ice cream maker with this refreshing lemon sorbet.  Sorbets are frozen sugar water flavored with fruit or alcohol.  Unlike ice cream, they do not contain milk, cream, or eggs.  Sorbets are sometimes served as a palette cleanser between multi-course meals; more often they are served as a dessert at the end of a meal.

The word ‘sorbet’ either comes from the Latin sorbetto meaning a mixture of solid and liquid food or the Arabic sharbat meaning drink or juice.  There are many stories about the origin of sorbet.  Some claim that it was invented by Roman Emperor Nero and others suggest that Marco Polo brought back a sorbet recipe from China.  Whatever its origin, sorbet is an increasingly popular summer treat.

Watch this space for other inventions enabled by our new ice cream maker!

Ingredients
1 cup fresh lemon juice (approximately 6 lemons)
2 1/2 cups water
1 1/4 cups granulated sugar


Directions
1.       Juice the lemons and set aside.
2.       In a medium saucepan, combine 3/4 cup water and all the sugar.  Grate the zest of two or three lemons directly into the mixture.
3.       Heat until the sugar is dissolved, stirring frequently.  Remove from the heat and transfer to a glass dish.  Add remaining water and lemon juice.  Mix well.
4.       Cover and cool in the refrigerator, preferably overnight.  The colder the mixture, the more likely it will produce an even texture in the ice cream maker.  The mixture may be kept in this state for several weeks.
5.       Prepare sorbet in an ice cream maker according to the manufacturer’s instructions.
6.       Transfer the mixture to a freezer-safe container to ripen for several hours.  The mixture should still be soft when you do this; resist the desire to over-churn as it will produce a dry and fluffy texture.  Do not serve directly from the ice cream maker.

7.       Serve as a palette cleanser or dessert.  Best served with other sorbets or topped with a drizzle of limoncello.